spring boot 源码版本 2.0.9.RELEASE。spring boot 高版本,没有走AutoConfigurationImportSelector#selectImports方法。
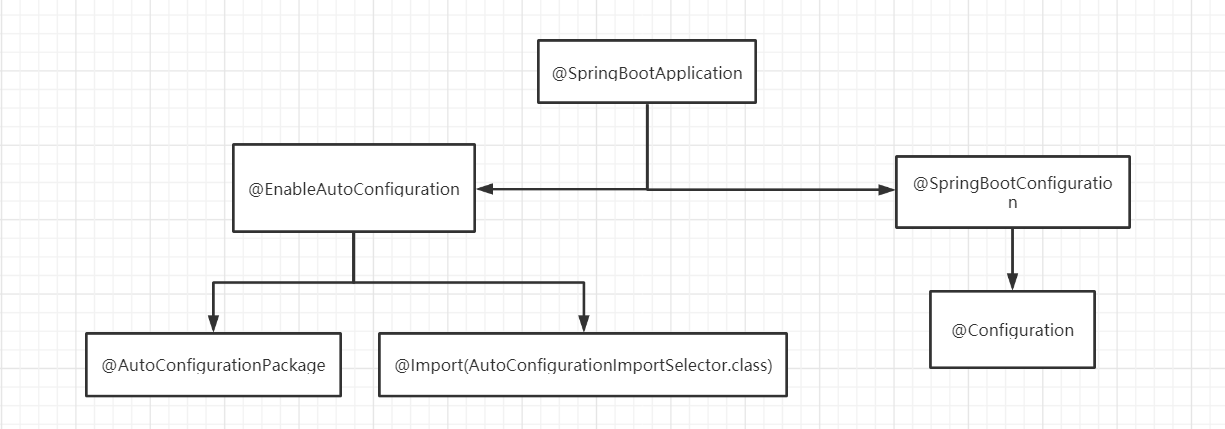
Spring Boot 自动装配 先看下Spring Boot 启动类注释 @SpringBootApplication。在这些注解中,重要的就是两个 @SpringBootConfiguration 和 @EnableAutoConfiguration。从下图可以看到该注解是个组合注解,本文关于自动装配,用了到里面的 @EnableAutoConfiguration 里面的 @Import(AutoConfigurationImportSelector.class)。
@Import({AutoConfigurationImportSelector.class}) 主要功能就是自动配置导入选择器。
AutoConfigurationImportSelector#selectImports 1 2 3 4 5 6 7 8 9 10 11 12 13 14 15 16 17 18 19 @Override public String[] selectImports(AnnotationMetadata annotationMetadata) { if (!isEnabled(annotationMetadata)) { return NO_IMPORTS; } AutoConfigurationMetadata autoConfigurationMetadata = AutoConfigurationMetadataLoader .loadMetadata(this .beanClassLoader); AnnotationAttributes attributes = getAttributes(annotationMetadata); List<String> configurations = getCandidateConfigurations(annotationMetadata, attributes); configurations = removeDuplicates(configurations); Set<String> exclusions = getExclusions(annotationMetadata, attributes); checkExcludedClasses(configurations, exclusions); configurations.removeAll(exclusions); configurations = filter(configurations, autoConfigurationMetadata); fireAutoConfigurationImportEvents(configurations, exclusions); return StringUtils.toStringArray(configurations); }
参数含义:
AnnotationMetadata:SpringBoot启动类上的注释的全限定名,比如 @com.springboot.sample.starter.annotation.EnableSampleServer()
AutoConfigurationMetadata:依赖的AutoConfiguration类的元数据
AutoConfigurationImportSelector#getCandidateConfigurations 1 2 3 4 5 6 7 8 9 10 11 12 13 protected List<String> getCandidateConfigurations (AnnotationMetadata metadata, AnnotationAttributes attributes) List<String> configurations = SpringFactoriesLoader.loadFactoryNames( getSpringFactoriesLoaderFactoryClass(), getBeanClassLoader()); Assert.notEmpty(configurations, "No auto configuration classes found in META-INF/spring.factories. If you " + "are using a custom packaging, make sure that file is correct." ); return configurations; } protected Class<?> getSpringFactoriesLoaderFactoryClass() { return EnableAutoConfiguration.class; }
从代码中可以看到,SpringFactoriesLoader.loadFactoryNames() 传入的参数有个 getSpringFactoriesLoaderFactoryClass,其实技术我们熟悉的 EnableAutoConfiguration 注释。
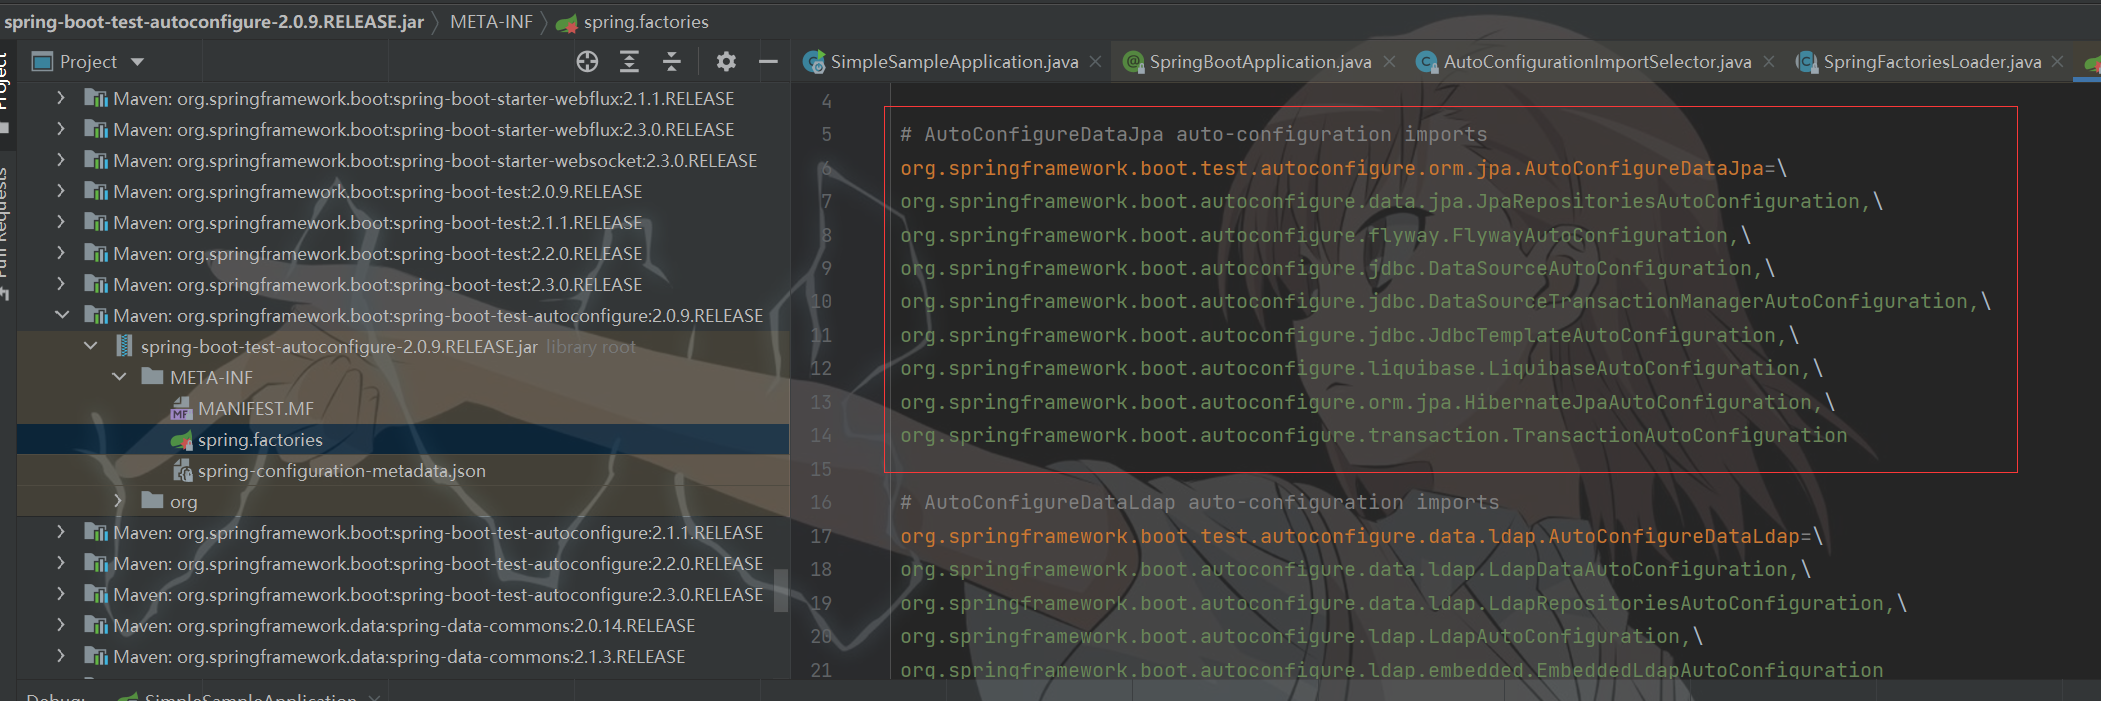
这里的逻辑就是通过 SpringFactoriesLoader.loadFactoryNames() 查询 configurations,如果没有查到,就打印日志。从日志中可以看出,实际需要需要加载的 Configuration 就是从 META-INF/spring.factories 中去加载的。
SpringFactoriesLoader#loadFactoryNames() 1 2 3 4 5 6 7 8 9 10 11 12 13 14 15 16 17 18 19 20 21 22 23 24 25 26 27 28 29 30 31 32 33 34 35 36 37 public static final String FACTORIES_RESOURCE_LOCATION = "META-INF/spring.factories" ; public static List<String> loadFactoryNames (Class<?> factoryClass, @Nullable ClassLoader classLoader) String factoryClassName = factoryClass.getName(); return loadSpringFactories(classLoader).getOrDefault(factoryClassName, Collections.emptyList()); } private static Map<String, List<String>> loadSpringFactories(@Nullable ClassLoader classLoader) { MultiValueMap<String, String> result = cache.get(classLoader); if (result != null ) { return result; } try { Enumeration<URL> urls = (classLoader != null ? classLoader.getResources(FACTORIES_RESOURCE_LOCATION) : ClassLoader.getSystemResources(FACTORIES_RESOURCE_LOCATION)); result = new LinkedMultiValueMap<>(); while (urls.hasMoreElements()) { URL url = urls.nextElement(); UrlResource resource = new UrlResource(url); Properties properties = PropertiesLoaderUtils.loadProperties(resource); for (Map.Entry<?, ?> entry : properties.entrySet()) { String factoryClassName = ((String) entry.getKey()).trim(); for (String factoryName : StringUtils.commaDelimitedListToStringArray((String) entry.getValue())) { result.add(factoryClassName, factoryName.trim()); } } } cache.put(classLoader, result); return result; } catch (IOException ex) { throw new IllegalArgumentException("Unable to load factories from location [" + FACTORIES_RESOURCE_LOCATION + "]" , ex); } }
从断点出可以看出,实际加载的就是 EnableAutoConfiguration的值。然后通过 Properties properties = PropertiesLoaderUtils.loadProperties(resource); 将文件内的内容封装成 Properties 对象。下图所加载的类就是一个自制的 spring boot starter 启动类。
总结 Spring Boot 启动会加载大量的启动类,会去搜索 META-INF/spring.factories 中的 EnableAutoConfiguration 的启动配置。
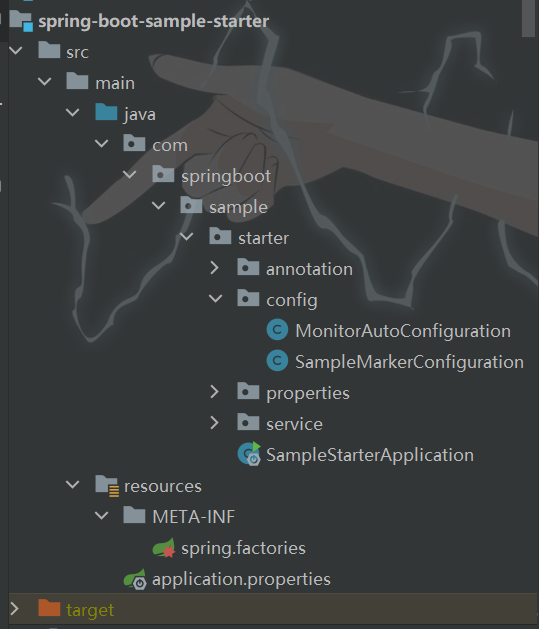
如何自己自作 Spring Boot Starter 依赖 先看下项目结构:
MonitorProperties 1 2 3 4 5 6 7 8 9 @ConfigurationProperties(prefix = "demo.monitor") public class MonitorProperties private String loginUrl; private String username; private String password; private String serverUrl; }
这个类就是我们在使用这个starter类,需要在配置文件中配置的参数
MonitorAutoConfiguration 1 2 3 4 5 6 7 8 9 10 11 12 13 14 @Configurable @ConditionalOnBean(SampleMarkerConfiguration.Marker.class) @EnableConfigurationProperties(MonitorProperties.class) public class MonitorAutoConfiguration @Autowired private MonitorProperties monitorProperties; @Bean @ConditionalOnMissingBean public MonitorService monitorService () return new MonitorService(monitorProperties); } }
自己制作 Configuration。@ConditionalOnBean 的含义是只有当 SampleMarkerConfiguration.Marker 这个 Bean 存在的时候,才会实现这个 Configuration,不然是不会初始化的。 @ConditionalOnMissingBean 注解的含义是当不存在 MonitorService 这个Bean 的时候,进行创建Bean。
SampleMarkerConfiguration 1 2 3 4 5 6 7 8 9 10 11 12 @Configurable public class SampleMarkerConfiguration @Bean public Marker sampleServerMarkerBean () return new Marker(); } class Marker } }
这个类其实就是一个激活 MonitorAutoConfiguration 的类。
EnableSampleServer 1 2 3 4 5 6 @Target(ElementType.TYPE) @Retention(RetentionPolicy.RUNTIME) @Documented @Import(SampleMarkerConfiguration.class) public @interface EnableSampleServer {}
这个注释就是放在SpringBoot上,作为启动的激活的一个标识。
使用 在需要的项目中引入starter依赖,在 Spring Boot 上加上 @EnableSampleServer 初始化类,这样就可以使用了。
starter中的具体业务逻辑或者功能,可以自己根据实际需求自己添加。
Spring Boot Starter Demo
Reference


